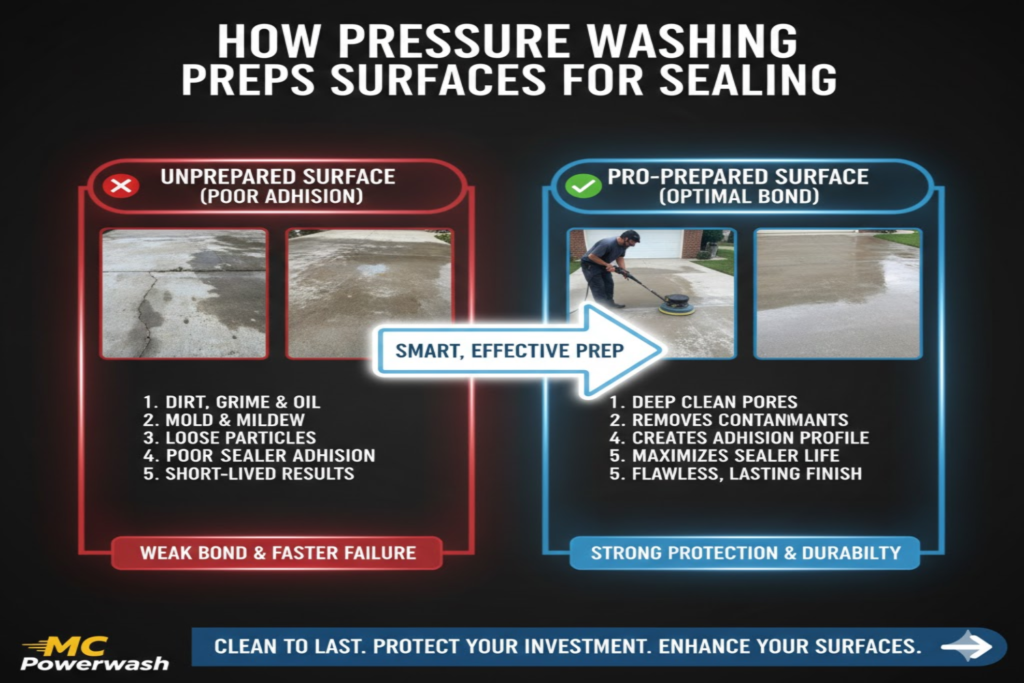
In the world of exterior restoration, there is a golden rule: The sealer is only as good as the surface beneath it. Many homeowners and amateur contractors make the mistake of viewing “sealing” as a way to hide a dirty or aging patio. In reality, sealing a dirty surface is a guaranteed way to accelerate its decay. Pressure washing is not merely a “cleaning” step in this process; it is a critical engineering phase known as Surface Preparation.
For a sealer to function—whether it is a penetrating repellent or a high-gloss film—it must achieve a “Mechanical Bond” with the substrate. If there is a microscopic layer of dust, a film of algae, or a drop of motor oil on the stone, the sealer will bond to that contaminant instead of the concrete. This leads to “delamination,” where the sealer peels off like a sunburned skin. Pressure washing transforms the surface from a clogged, non-receptive slab into a porous, “open” canvas that is ready to absorb the protective resins of the sealer.
2. Deep Pore Cleansing: Removing the Invisible Barrier
When you look at a concrete driveway, it may look solid, but under a microscope, it is a vast network of capillaries and “pores.” Over time, these pores become choked with environmental pollutants that a standard garden hose cannot reach.
Microscopic Biofilms
Even if a walkway doesn’t look “green,” it likely harbors a biofilm. This is a sticky, microscopic layer of bacteria and fungi that acts as a waterproof shield. If you apply sealer over this biofilm, the sealer will fail to penetrate the pores. Pressure washing, particularly when combined with an oscillating “Turbo Nozzle,” uses high-velocity water to shear this biofilm off the surface, ensuring the sealer can reach the “heart” of the stone.
Extraction vs. Rinsing
There is a massive difference between “rinsing” a surface and “extracting” dirt from it. Pressure washing creates a vacuum effect at the surface level, pulling deep-seated dirt and carbon soot (from car exhaust) out of the capillaries. By evacuating these pores, you create “space” for the sealer to occupy. If the pores are full of dust, the sealer has nowhere to go but to sit on top of the surface, where it will quickly wear away.
Stripping the “Grey Film”
Old concrete often develops a dull grey film. This is usually a combination of oxidation and accumulated atmospheric pollutants. Pressure washing “exfoliates” this dead layer, revealing the fresh, vibrant minerals underneath. This is essential because the colors of your stone will “pop” much more vividly under a sealer if that grey film has been removed.
3. Mechanical Profiling: Creating “Tooth” for the Sealer
In the coatings industry, we talk about CSP (Concrete Surface Profile). This is a measurement of how “rough” or “smooth” the surface is. A surface that is too smooth—like power-troweled garage floors—has no “tooth” for a sealer to grab.
The “Sandpaper” Effect
Pressure washing provides a mild form of “water-blasting” that creates a microscopic texture on the stone. This texture increases the total surface area that the sealer can adhere to. Think of it like using fine-grit sandpaper on wood before staining; the “scuffing” allows the coating to anchor itself.
Removing “Laitance”
Laitance is a weak, milky layer of fine dust and cement particles that often sits on the surface of concrete. If you seal over laitance, your sealer will eventually peel off, bringing that fine dust with it. High-pressure water effectively “blasts” away this weak layer, ensuring that the sealer is bonding to the solid, structurally sound concrete beneath it.
4. Chemical Decontamination during the Wash
Water alone is sometimes not enough. Preparing for a sealer often requires a chemical intervention that is then “flushed” by the pressure washer.
Degreasing for Total Success
Sealers are generally hydrophobic (water-fearing) or oil-based. If there is a single drop of motor oil or BBQ grease on the patio, the sealer will “fish-eye”—it will literally pull away from the oil spot, leaving an unsealed hole in your protection. Pressure washing with a high-pH degreaser is the only way to emulsify these oils and lift them out of the concrete’s “gutters.”
pH Balancing and Rinsing
Most concrete cleaners are either very acidic or very alkaline. If these chemicals are left on the surface, they can react with the sealer and cause it to turn yellow or cloudy. The high-volume rinse of a pressure washer (ideally $4$-$8$ GPM) ensures that the pH of the stone is returned to a neutral state (around $7.0$), providing a stable environment for the sealer to cure.
5. [Table Section] Surface Prep Requirements by Sealer Type
| Sealer Type | Mechanism | Required Surface Prep | Pressure Level (PSI) |
| Penetrating (Natural) | Soaks into pores | Deep extraction; $100\%$ open pores | $2,000 – 2,500$ |
| Film-Forming (Gloss) | Sits on top | Mechanical “tooth” / Etching | $2,500 – 3,000$ |
| Solvent-Based | Chemical bond | Absolute dry; No chemical residue | $2,000$ |
| Water-Based | Physical bond | Saturated Surface Dry (SSD) | $1,500 – 2,000$ |
6. Dealing with the “Joints”: Prep for Polymeric Sand
If you are sealing a paver patio, the joints are just as important as the stones themselves.
Emptying the Gaps
To get a good seal and a stable joint, you must remove the old, contaminated sand. Using a Turbo Nozzle, you should clean out the joints to a depth of at least $1$ to $1.5$ inches. This ensures that when you put in new polymeric sand, it has a clean surface to “glue” to.
Structural Cleaning
It’s not enough to just clean the tops of the pavers. The sides of the pavers must also be clean. If the sides are covered in moss or slime, the new sand won’t bond to the stone, and the joints will fail during the first rainstorm. Pressure washing allows you to “scour” the vertical edges of the pavers, creating a perfect channel for the joint-stabilizing sealer.
7. [Bullet Points Section] The Risks of “Lazy” Preparation
Cutting corners during the pressure washing phase is the most expensive mistake you can make. If the prep is flawed, the sealer becomes a liability rather than an asset.
- The “Milky” Finish: If you don’t use enough pressure to clear out deep-seated moisture or if you seal over trapped humidity, the sealer will undergo “blushing.” This creates a white, cloudy haze that obscures the stone. Fixing this usually requires stripping the sealer with harsh chemicals—a nightmare of a job.
- Peeling and Delamination: Without the “mechanical profiling” mentioned earlier, the sealer simply rests on the surface dust. Within one season of foot traffic or car tires, the sealer will begin to peel off in sheets, leaving your patio looking patchy and neglected.
- Dark Spotting and Rot: If organic matter (algae or mold) isn’t $100\%$ sterilized and removed during the wash, it will continue to grow underneath the sealer. Since the sealer traps the organism but allows it to feed on trapped moisture, you’ll see black or green “bruises” forming under the coat that cannot be cleaned off.
8. The “Dry-Out” Protocol: The Most Important Step
The greatest enemy of a new sealer is water. Even though you just used water to clean the surface, it is now your biggest threat.
The 48-Hour Rule
Surface-level dryness is a lie. Concrete can look dry in 2 hours but remain saturated at its core for days.
- The Standard: You must wait at least 48 hours of dry weather before applying sealer.
- The Physics: Sealers are designed to “drive” into the pores. If those pores are still occupied by water molecules from your pressure wash, the sealer has nowhere to go.
The “Plastic Sheet Test”
Unsure if your driveway is dry enough? Tape a $2\times2$ foot piece of clear plastic over a section of the concrete for 24 hours. If you see condensation or “fogging” under the plastic, the slab is still “breathing” moisture, and you must wait another day to seal.
9. Advanced Techniques for High-End Stone
When prepping delicate surfaces like Travertine, Slate, or Marble, the “Blast it” approach is dangerous.
- Soft Washing as a Prep: Instead of using raw PSI to kill algae, use a professional-grade biocide. This ensures $100\%$ sterilization of the pores without the risk of “etching” or “gouging” the soft natural stone.
- Low-Pressure, High-Volume Rinsing: Use a wider fan tip ($40^\circ$) and move the wand closer. This uses the weight of the water to flush out contaminants rather than the velocity of the water to cut into the stone.
10. Environmental Compliance during Prep
Prepping for sealer often involves more chemicals than a standard maintenance wash.
- Slurry Management: When you deep-clean joints, you create a “slurry” of old sand and dirt. Ensure this does not enter storm drains. Use a “Wet-Vac” or sandbags to filter the water before it leaves your property.
- Eco-Friendly Etching: If you need to profile the concrete, look for “Green” etching agents rather than traditional Muriatic Acid. They provide the same “tooth” for the sealer without the toxic fumes or runoff.
11. Conclusion: Doing It Right the First Time
Pressure washing is the silent partner in every beautiful patio photo you see online. It isn’t just about making the stone look “pretty” for a moment; it’s about the chemistry of the bond and the physics of the pore. By investing the time to deeply extract contaminants, neutralize the pH, and properly profile the surface, you are ensuring that your sealer will last for its full rated lifespan.
In the end, the “Visual Dividend” of proper prep is undeniable. A surface that has been professionally prepped will allow the sealer to clarify the stone’s colors and provide a uniform, high-definition finish that “Lazy Prep” simply cannot achieve.
12. FAQs: Expert Advice on Pre-Sealing Prep
Can I seal the same day I pressure wash?
No. Unless you are using a very specific “wet-surface” breathable sealer (which is rare), you will cause the sealer to fail. Always wait for the 48-hour dry window.
What PSI is safe for prepping old concrete?
For old concrete, stay between 2,000 and 2,500 PSI. Anything higher risks blowing off the “cream coat,” which makes the surface look rocky and uneven once the sealer is applied.
Do I need to use soap, or is water enough?
Water removes dirt; soap (surfactants) removes oil. Since sealers hate oil, you should almost always use a degreaser during the prep phase to ensure a perfect bond.