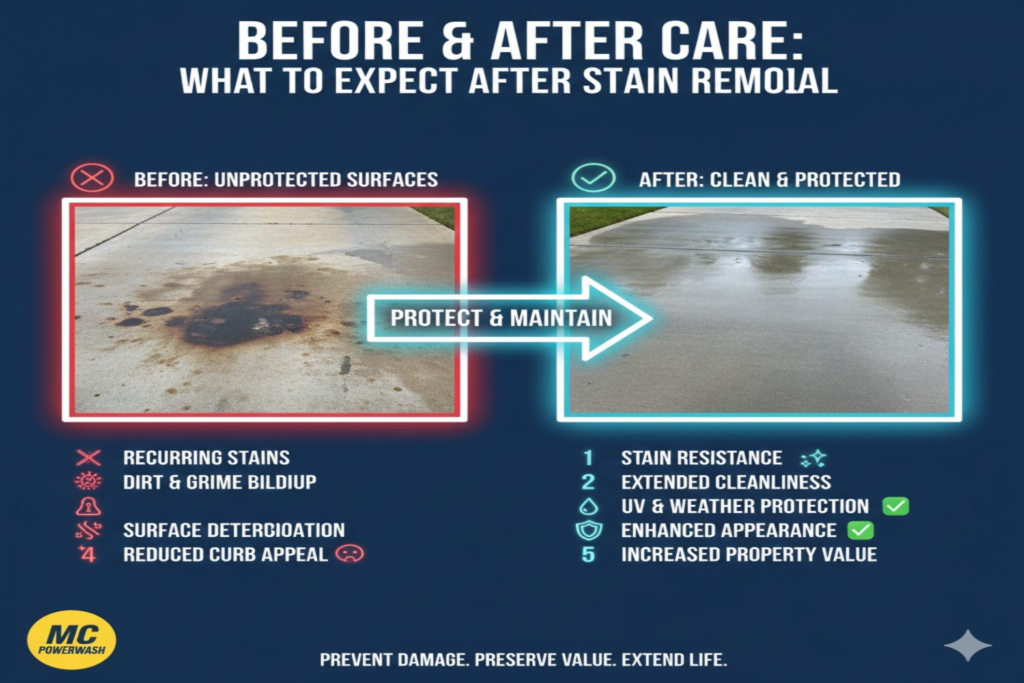
Stain removal from concrete, walls, metal, or other surfaces requires careful before and after care to achieve the best results and prevent damage or recurrence. In Los Angeles, where sun exposure, hard water, and coastal humidity affect how surfaces respond, proper preparation and post-care make a significant difference. Before removal, protect surrounding areas, test products, and address the stain source. After removal, expect drying time, possible faint shadows, surface pH changes, and the need for neutralization or resealing. Skipping aftercare often leads to discoloration, etching, mold, or rapid re-staining. Surfaces may look uneven at first but improve as they dry and cure. Understanding the process helps set realistic expectations. With proper before and after steps, most stains can be removed effectively with long-lasting results.
Why Before and After Care Is Essential
Before care prevents spreading stains, protects nearby surfaces, and ensures the chosen method is safe for the material. After care stabilizes the cleaned area, neutralizes chemical residues, restores protective layers, and prevents new damage from moisture or UV exposure. In Los Angeles, intense sunlight can cause cleaned areas to chalk or fade unevenly if not sealed. Poor aftercare allows water intrusion, efflorescence, or mold growth in humid coastal zones. Proper preparation reduces the risk of etching, pitting, or discoloration during removal. Post-treatment steps lock in results and extend surface life. Neglecting either phase often leads to callbacks and higher long-term costs. Comprehensive care turns stain removal into a lasting improvement.
Before Care: Protecting Surrounding Areas
Cover plants, grass, and landscaping with plastic sheeting or drop cloths before starting any stain removal. Wet nearby vegetation heavily to dilute potential chemical overspray. Mask windows, doors, vehicles, and adjacent walls with painter’s tape and plastic. Use absorbent booms or towels around the work area to contain runoff. Move furniture, planters, or vehicles away from the stain zone. Turn off nearby sprinklers to avoid water interference. Check weather forecasts to avoid rain or high winds during treatment. Proper protection prevents collateral damage and simplifies cleanup. It also maintains good neighbor relations. Preparation creates a controlled environment for safe stain removal.
Before Care: Testing Products and Surface Compatibility
Always test any cleaner, stripper, or degreaser on a small, hidden area first. Apply the product, wait the recommended dwell time, then rinse and check for etching, discoloration, or softening. Test on both the stain and surrounding surface. For painted or sealed areas, confirm the product does not lift existing coatings. On concrete, sprinkle water to check if it is sealed—if water beads, use gentler methods. Testing prevents surprises and irreversible damage. It allows adjustment of concentration or dwell time. Proper compatibility testing ensures safe and effective stain removal. This simple step saves time and money.
Before Care: Addressing the Stain Source
Identify and stop the source of the stain before removal begins. Fix oil leaks, repair rusting metal, redirect sprinklers, or contain dripping paint. Clean tools, planters, or vehicles that caused the stain. Remove rusting rebar exposure or seal cracks that allow iron-rich water to seep. Addressing the origin prevents immediate re-staining after cleaning. In many cases, the stain will keep returning until the source is fixed. Proactive source control makes removal efforts worthwhile. It also protects the surface long-term. Fixing the cause is as important as the removal process itself.
What to Expect Immediately After Stain Removal
After rinsing, the surface may appear uneven, blotchy, or slightly lighter/darker in the treated area. Freshly cleaned spots often look brighter or cleaner than surrounding areas due to residue removal. Some stains leave faint shadows or halos that become less noticeable as the surface dries. Chemical treatments can temporarily leave a slick or powdery film if not rinsed properly. Concrete may show slight efflorescence (white powdery deposits) as moisture evaporates. Metal surfaces may appear etched or dulled if aggressive methods were used. Immediate appearance can be disappointing but improves with drying and aftercare. Patience is required during this phase.
Drying and Curing Expectations
- Most surfaces need 24–72 hours to dry completely after wet cleaning methods.
- Concrete and masonry can take 3–7 days to fully release trapped moisture.
- In Los Angeles, dry air speeds surface drying but deeper moisture may linger.
- Avoid foot traffic, furniture placement, or water exposure during this period.
- Paint, sealers, or coatings should not be applied until the surface is bone-dry (use a moisture meter if possible).
- Rushing application causes bubbling, peeling, or poor adhesion.
- Full curing of any applied products can take 7–30 days.
- Proper drying prevents future issues. Allow adequate time for the best outcome.
Possible Side Effects After Stain Removal
Faint shadows or ghosts may remain even after thorough removal, especially from old oil, rust, or paint stains. Concrete can develop light etching or texture changes from acids or pressure washing. Painted surfaces may show slight color differences where stripping occurred. Metal can appear dulled or lightly pitted if strong removers were used. Efflorescence (white salty deposits) may appear temporarily on concrete as it dries. Some sealers or coatings can look uneven until fully cured. Most side effects fade or become unnoticeable over time. Proper aftercare minimizes these issues. Understanding expectations prevents disappointment.
After Care: Neutralizing Chemical Residue
If acid-based or alkaline removers were used, neutralize the surface to prevent future paint failure or discoloration. For acids, apply a diluted baking soda solution (1 cup per gallon of water), scrub lightly, and rinse thoroughly. For alkaline strippers, use a mild vinegar solution (1:10 ratio) followed by multiple rinses. Test pH with litmus paper—aim for neutral (6.5–8.5). Neutralization stops chemical reactions with future coatings. It is especially important before priming or painting. Skipping this step often causes peeling or bubbling later. Proper neutralization creates a stable base. It is a critical aftercare step.
After Care: Resealing Concrete and Masonry
Apply a high-quality penetrating or acrylic concrete sealer after the surface is completely dry. Penetrating sealers soak in and protect from within without changing appearance. Film-forming acrylic sealers add gloss and stronger stain resistance. Use a roller or sprayer for even coverage and apply two thin coats. Resealing closes pores, prevents future oil or rust absorption, and hides minor shadows. In Los Angeles, UV-resistant sealers last longer against sun damage. Reapply every 1–3 years depending on exposure. Proper sealing is the best long-term protection. It maintains clean, stain-resistant surfaces.
After Care: Protecting Metal Surfaces
- Apply a rust-inhibiting primer followed by rust-resistant enamel or direct-to-metal paint on cleaned metal surfaces.
- Use clear rust converters on light surface rust before coating.
- Wax or ceramic coatings provide extra protection on vehicles or outdoor furniture.
- Regular maintenance with mild soap prevents new oxidation.
- Inspect metal surfaces monthly for early rust spots.
- Touch up chips or scratches promptly.
- Protective coatings prevent recurrence of rust stains.
- They restore appearance and extend metal life.
- Consistent aftercare keeps metal surfaces clean and functional.
After Care: Monitoring and Maintenance
Inspect treated areas weekly for the first month to catch any efflorescence, discoloration, or new staining. Clean surfaces gently with pH-neutral detergent and soft brush every few months. Avoid harsh chemicals or high-pressure washing on newly treated areas. Reapply sealers or coatings on schedule. Document products used and dates for future reference. Address any new leaks, drips, or rust sources immediately. Regular monitoring prevents small problems from becoming large ones. Consistent maintenance preserves removal results. It ensures surfaces stay clean long-term.
What to Avoid After Stain Removal
Do not apply paint, sealer, or coatings until the surface is fully dry and neutralized. Avoid heavy foot traffic, furniture placement, or water exposure during curing. Do not use harsh scrubbers or abrasive pads on newly cleaned surfaces. Avoid parking vehicles or placing planters on treated concrete until sealed. Do not ignore faint shadows—they often fade with time and proper sealing. Avoid skipping neutralization after chemical treatments. Avoiding these mistakes prevents peeling, bubbling, or re-staining. Proper post-care habits protect your investment. They guarantee lasting results.
When to Call Professionals for After Care
Hire professionals if large areas need sealing, complex resurfacing is required, or structural concerns appear after removal. They have commercial-grade sealers, sprayers, and application expertise. Pros ensure even coverage and proper curing. In Los Angeles, experienced restoration teams understand local concrete and climate challenges. They handle wastewater and disposal legally. Professionals provide warranties on workmanship. Get multiple quotes for large jobs. Complex aftercare warrants expert help. Professionals deliver uniform, durable results.
Long-Term Expectations After Proper After Care
Well-prepared and sealed surfaces resist new stains significantly longer. Faint shadows usually become nearly invisible after sealing and weathering. Paint or coatings applied over properly prepared areas last 5–15 years depending on exposure. Regular maintenance extends protection further. Surfaces stay cleaner with less effort. Property appearance and value improve noticeably. Long-term aftercare reduces repeat removal needs. It creates a cycle of protection rather than repeated damage. Consistent care delivers lasting benefits. It makes stain removal a one-time effort.
Comparison Table: Common After-Care Steps & Expected Outcomes
| After-Care Step | Purpose | Time Required | Cost Level | Expected Outcome | Common Mistake to Avoid | Recommended Products/Tools |
| Thorough Final Rinsing | Remove all chemical residue | 1–3 hours | Low | Clean, non-slick surface | Leaving slippery film | Garden hose, wet vac |
| pH Neutralization | Prevent paint failure later | 30 min–2 hours | Low | Neutral surface (pH 6.5–8.5) | Skipping neutralization | pH strips, vinegar/baking soda |
| Full Drying Period | Allow moisture to escape | 24 hrs – 7 days | None | Bone-dry surface ready for sealing | Applying coatings too early | Moisture meter (optional) |
| Concrete/Masonry Sealing | Close pores, prevent re-staining | 2–6 hours | Medium | Stain-resistant, uniform appearance | Using interior sealer outdoors | Penetrating or acrylic sealer |
| Metal Rust-Inhibiting Coating | Prevent future oxidation | 2–4 hours | Medium | Rust-resistant surface | Skipping primer | Rust-inhibitive primer + enamel |
| Regular Inspections & Cleaning | Catch issues early | Ongoing | Low | Long-term stain prevention | Ignoring small new stains | Mild detergent, soft brush |
How Long-Term After Care Saves Money
Investing in proper sealing and maintenance after stain removal reduces repeat cleaning needs by 50–80%. Sealed surfaces resist oil, rust, and dirt far better than untreated ones. Early detection of small issues prevents expensive resurfacing or full repainting. Quality sealers last 1–5 years, delaying major maintenance. Reduced chemical use and fewer professional visits lower ongoing costs. Well-maintained surfaces increase property value and tenant appeal. Long-term care transforms one-time stain removal into permanent protection. It minimizes future expenses significantly. Preventive aftercare is the most cost-effective strategy.
Conclusion
Before and after care during stain removal determines whether results are temporary or long-lasting. Thorough preparation protects surroundings and ensures safe treatment, while proper aftercare—rinsing, neutralizing, drying, sealing, and maintenance—locks in success. In Los Angeles, where sun and weather extremes challenge surfaces, these steps are especially critical. Expect initial uneven appearance, drying periods, and possible faint shadows, but with correct care, surfaces stabilize and improve over time. Skipping aftercare often leads to re-staining, peeling, or early failure. Investing time in both phases prevents costly mistakes. With consistent before and after attention, stain removal becomes a one-time effort that delivers clean, protected, and beautiful surfaces for years.
Frequently Asked Questions (FAQs)
1. How long should I wait before walking on treated concrete after stain removal?
Wait at least 24–72 hours after final rinsing, longer if sealers are applied. Full traffic resistance usually returns after 7 days of curing. Avoid heavy furniture or vehicles for 2–4 weeks after sealing. Early traffic can cause marks or damage fresh coatings.
2. Will faint shadows or ghosts disappear completely after stain removal?
Faint shadows often fade significantly over time, especially after sealing and weathering. Deep oil or rust stains may leave a light halo that is less noticeable once sealed. Proper priming and painting further minimize visibility. Complete disappearance depends on stain age and depth.
3. Do I really need to neutralize after chemical stain removal?
Yes, neutralization prevents chemical residues from interfering with sealers or paint. Alkaline or acid residues can cause peeling, bubbling, or discoloration later. Always test pH and neutralize to 6.5–8.5 before coating. Skipping this step is a common cause of paint failure.
4. How soon after stain removal can I apply concrete sealer?
Wait until the surface is completely dry—usually 24–72 hours after rinsing, longer in humid conditions. Use a moisture meter to confirm dryness. Apply sealer only on a clean, neutral surface. Early application traps moisture and causes failure.
5. What should I do if efflorescence appears after cleaning?
Efflorescence (white powdery deposits) is normal as concrete dries. Brush it off dry, then rinse lightly. It usually stops after full drying. If persistent, check for water intrusion sources. Resealing after it disappears prevents recurrence.
6. Can I park my car on a treated driveway immediately after removal?
No—wait at least 7–14 days after sealing to allow full cure. Early vehicle weight can imprint or damage fresh coatings. Use drip pans under the car even after curing to prevent new oil stains. Patience protects the new surface.
7. Will treated areas look different from untreated areas after cleaning?
Yes, cleaned spots may appear lighter or cleaner at first due to residue removal. Shadows or texture differences may show until sealed or weathered. Proper priming and painting blend areas effectively. Over time, differences usually become unnoticeable.
8. How often should I reseal concrete after stain removal?
Reseal every 1–3 years depending on exposure and traffic. High-sun or high-traffic areas need more frequent reapplication. Check water beading annually—if water soaks in, reseal. Regular sealing maintains stain resistance and appearance.
9. What maintenance should I perform after rust stain removal on metal?
Apply rust-inhibiting primer and protective paint or coating after cleaning. Inspect monthly for new oxidation. Touch up scratches immediately. Use mild soap for regular cleaning. Protective coatings and early touch-ups prevent recurrence.
10. How do I know if my surface is fully ready for painting after stain removal?
Confirm dryness with a moisture meter or plastic sheet test. Check pH neutrality. Ensure no chemical smell or slickness remains. Apply a test patch of primer—if it adheres well and shows no bleed-through after 24 hours, the surface is ready. Testing guarantees success.