To the naked eye, a concrete driveway looks like an immovable, indestructible slab of rock. It holds the weight of multi-ton SUVs and survives decades of scorching sun and torrential rain. This perceived “toughness” is exactly what leads homeowners into a trap. When a DIYer rents a $4,000$ PSI pressure washer, they often approach the driveway with a “more power is better” mindset, treating the wand like a laser that can simply erase time and grime.
However, concrete is actually a complex, porous material. It has a delicate surface chemistry and a structural “finish” that, once destroyed, can never be truly restored. The permanent nature of pressure washing damage is the harshest reality of the trade—you cannot “un-ring” the bell. Once you carve a line into the stone or strip away the smooth top layer, you are left with a permanent scar that will collect dirt faster than before. This guide identifies the technical errors that turn a simple cleaning chore into a catastrophic property value loss.
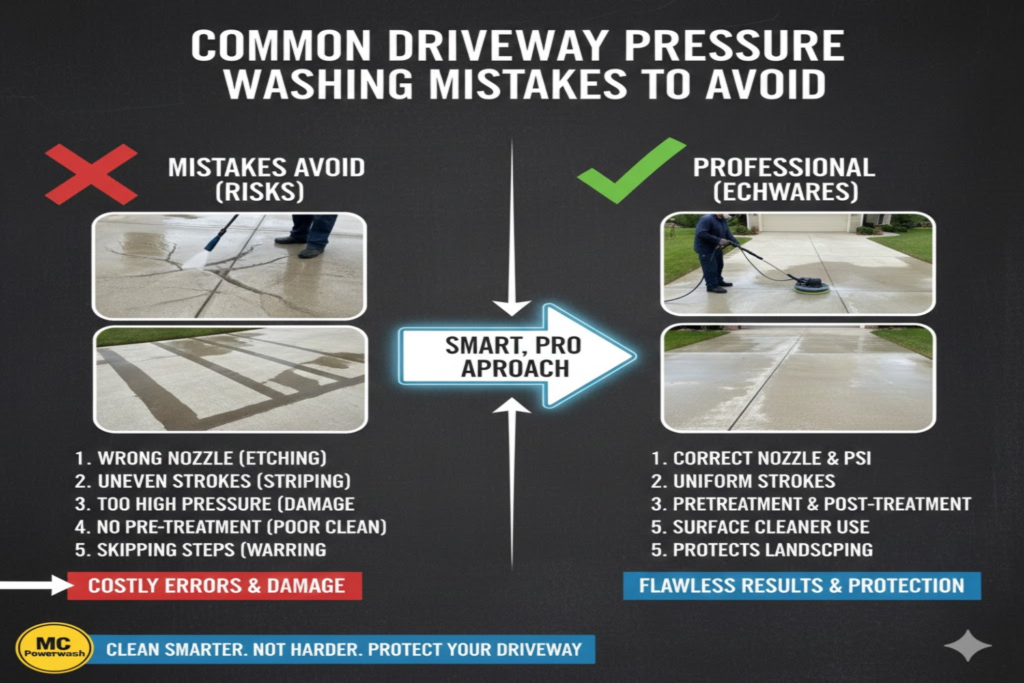
2. The “Red Tip” Trap: Using the Wrong Nozzle
The most dangerous object in the hands of an amateur is the $0^\circ$ (Red) spray tip. Most pressure washer kits come with a variety of color-coded nozzles, and the red one is designed for one thing: high-impact, pinpoint cleaning of hard-to-reach metal or industrial equipment. It should almost never touch a residential driveway.
The “Chisel Effect”
At $3,000$ or $4,000$ PSI, the water coming out of a $0^\circ$ nozzle isn’t “washing” the concrete; it is “chiseling” it. Because the stream is so narrow, the force is concentrated on a spot the size of a pencil lead. If the operator hesitates for even a millisecond, the water will carve permanent “graffiti” or swirls into the surface. These marks are not just ugly; they are structural wounds that allow water to penetrate deeper into the slab, leading to cracks during freeze-thaw cycles.
The Safe Alternatives
A professional-grade clean relies on a fan-pattern nozzle.
- The $25^\circ$ (Green) Tip: This is the “workhorse” for concrete. It provides enough force to lift dirt but spreads the pressure across a wider area to prevent etching.
- The $40^\circ$ (White) Tip: Best for delicate or decorative stone, or for a final rinse. It provides a gentle wash that won’t disturb the integrity of the material.
3. “Zebra Striping”: The Mark of the Amateur
If you have ever seen a driveway that looks like it has “light and dark” tiger stripes running through it, you are looking at a classic pressure washing blunder. This is caused by inconsistent wand movement and a lack of technical discipline.
Inconsistent Distance and the Pendulum Swing
Amateurs tend to swing the pressure washing wand in a “pendulum” motion—the nozzle is close to the ground at the center of the arc and far from the ground at the ends. Because the impact force of water decreases exponentially with distance, the center of the arc gets cleaned deeply while the ends remain dirty. This creates a “u-shaped” cleaning pattern that looks like a series of stripes.
The “Overlap” Rule
To achieve a uniform clean, you must overlap each stroke by at least $50\%$. However, even with perfect overlapping, using a standard wand on a large driveway is nearly impossible to get $100\%$ consistent.
The Pro Fix: The Surface Cleaner
Professionals almost never use a wand for the “bulk” of a driveway. They use a Surface Cleaner—a circular attachment with rotating nozzles inside. This tool maintains a fixed distance from the ground and ensures the water hits every square inch with the exact same pressure. It is the only way to guarantee a “stripe-free” finish that looks like a new pour.
4. “Cream Coat” Erosion: Stripping the Finish
Perhaps the most heartbreaking mistake is the “Clean-to-Death” scenario. This happens when an operator uses too much pressure on a driveway that is actually in decent shape, but they want to make it “sparkle.”
What is the Cream Coat?
When concrete is poured, the heavy rocks (aggregate) sink to the bottom, and a smooth, fine layer of cement and sand (the Cream Coat) rises to the top. This layer is what gives your driveway its smooth, light-gray appearance. It is also the most vulnerable part of the slab.
The “Rocky” Look
If you use excessive PSI (anything over $3,000$ on older concrete), you will strip away the cream coat. Once this layer is gone, you expose the “aggregate” (the jagged rocks and pebbles) underneath. Your driveway will suddenly look “bony” or “rocky.” Not only does this look aged and poorly maintained, but it also makes the surface much rougher to walk on and significantly more difficult to clean in the future because dirt now has thousands of new “pockets” to hide in.
PSI vs. GPM (Volume is King)
The mistake is focusing on Pressure (PSI) when you should be focusing on Volume (GPM – Gallons Per Minute). High GPM allows you to wash away the dirt with a “heavy” flow of water rather than “blasting” it with high pressure. A $4.0$ GPM machine at $2,500$ PSI will clean a driveway faster and more safely than a $2.0$ GPM machine at $4,000$ PSI.
5. The “Mistake vs. Consequence” Matrix
| Mistake | Immediate Damage | Long-Term Cost | The Professional Fix |
| Using Red ($0^\circ$) Tip | Permanent etching/swirls | Reduced property value; crack risk | Use Green ($25^\circ$) tip or Surface Cleaner |
| Swinging the Wand | Zebra Striping / Splotches | Requires professional re-wash | Maintain 4-inch distance & $50\%$ overlap |
| Excessive Pressure | Cream Coat Erosion | Permanent “rocky” texture; needs resurfacing | Keep PSI below $3,000$ for residential |
| No Pre-Treatment | Algae returns in 4 weeks | Frequent washing wears down concrete | Pre-treat with Sodium Hypochlorite (Bleach) |
| Dry Cleaning | Sand/Dirt scratching the surface | Scuffed sealer or stone | Always pre-wet the surface |
6. The “Chemical-Free” Fallacy: Relying Only on Water
A common misconception among DIYers is that pressure washing is purely a mechanical process. Many believe that if they just turn the pressure up high enough, they can “blast” away any stain. This is a mistake that leads to both surface damage and a very short-lived clean.
The Biological Bond
Algae, moss, and lichen aren’t just sitting on top of your driveway; they are rooted into the pores. Water alone often just “mows the lawn”—it cuts off the visible green tops but leaves the roots (spores) alive deep inside the concrete. Within 4 to 8 weeks, especially in humid or shaded areas, the green tint will return with a vengeance.
- The Solution: You must use a biocide (typically a Sodium Hypochlorite solution). This kills the organic growth at the root level, ensuring the driveway stays clean for 3 to 4 times longer than a water-only wash.
Oil Stain Spreading
When you hit a fresh oil spot with high pressure without a degreaser, the water acts as a transport mechanism. Instead of lifting the oil, the pressure drives the microscopic oil molecules deeper into the concrete’s sub-base or spreads them out, creating a much larger “shadow” stain.
- The Solution: Always use a pH-balanced degreaser and a stiff brush to emulsify the oil before the pressure washer even comes out of the garage.
7. Neglecting “Collateral Damage”
When you’re focused on the ground, it’s easy to forget what’s around it. The “backsplash” and runoff from a pressure washer are surprisingly destructive.
Etching Garage Doors and Siding
The water hitting your driveway doesn’t just disappear; it ricochets. This backsplash is a mixture of high-pressure water, grit, and chemicals. If this hits a painted garage door or vinyl siding, it can strip the paint, leave “oxidation streaks,” or cloud the windows.
- The Mistake: Failing to rinse the garage door and surrounding walls every 10 minutes during the process.
Landscape Lethality
Many driveway cleaners contain salts or bleaches. If this runoff pools on your lawn or drips onto your prized rose bushes, it will cause “chemical burn.”
- The Pro-Tip: Pre-wetting is mandatory. Thoroughly soak your grass and plants with a garden hose before you start. This saturates the plants so they cannot “drink” the chemical runoff. Rinse them again once the job is finished.
Joint Washout
If your driveway is made of pavers or has expansion joints, hitting them directly with a wand will blow out the sand or oakum filler. This destabilizes the driveway and creates a perfect trench for weeds to grow.
8. Operational Errors and Safety Lapses
Sometimes the mistake isn’t on the driveway, but with the machine itself or the way you handle it.
- The “Dry Start” Disaster: Running a pressure washer pump without water flowing through it for more than 30 seconds. This causes cavitation, where the pump overheats and the seals melt. Always have the water on and the trigger squeezed to bleed air before starting the engine.
- Working from the Bottom-Up: If your driveway has a slope, never start at the bottom. The dirty “slurry” will constantly flow over the areas you just cleaned, forcing you to use twice as much water and time. Always work from the high point down to the street.
- The “Ladders and Lances” Trap: Never use a pressure washer on a ladder. The “recoil” of the gun can easily knock you off balance. For driveways with high retaining walls, use an extension wand (telescoping pole) instead.
9. Post-Wash Neglect: The “Open Pore” Problem
The job isn’t done when the water stops. The state you leave your concrete in after a wash determines how it will age.
Skipping the Sealer
Pressure washing is like an exfoliation treatment for concrete; it leaves the pores wide open. If you don’t seal the driveway after a deep clean, it is actually more vulnerable to oil and salt damage than it was when it was dirty. Unsealed, freshly washed concrete acts like a thirsty sponge.
The Slurry “Mud-Line”
As you finish the driveway near the street, a thick pile of grey “slurry” (fine sand and dirt) usually accumulates. If you don’t wash this all the way into the gutter or pick it up, it will dry into a permanent, hard mud-line that ruins the “curb appeal” you just worked so hard to create.
10. Conclusion: Precision Over Power
Driveway maintenance is an art form that requires a delicate balance of chemistry and mechanics. The most successful “washes” are those where the operator let the detergents do the heavy lifting and used the pressure washer simply as a tool for extraction and rinsing.
By avoiding the “Red Tip” trap, respecting the “Cream Coat,” and protecting your surrounding landscape, you ensure that your driveway doesn’t just look clean for a week—it stays healthy for a decade. Remember: You can always add more pressure, but you can never put the concrete back once you’ve blasted it away.
11. FAQs: Avoiding the “Oops” Moments
How close should the nozzle be to the ground?
For a standard fan tip, keep it 6 to 12 inches away. If you have to get closer than 4 inches to get the dirt off, you need to use a stronger chemical, not more pressure.
Is it okay to pressure wash a driveway with cracks?
Be extremely careful. If you blast water directly into a crack, it can travel under the slab and erode the dirt underneath, causing the crack to get wider or the slab to sink.
Can I use a pressure washer to remove paint?Yes, but if your home was built before 1978, that paint might be lead-based. Pressure washing lead paint turns it into microscopic dust that you, your family, and your neighbors will breathe in. This is a major EPA violation and a health hazard.