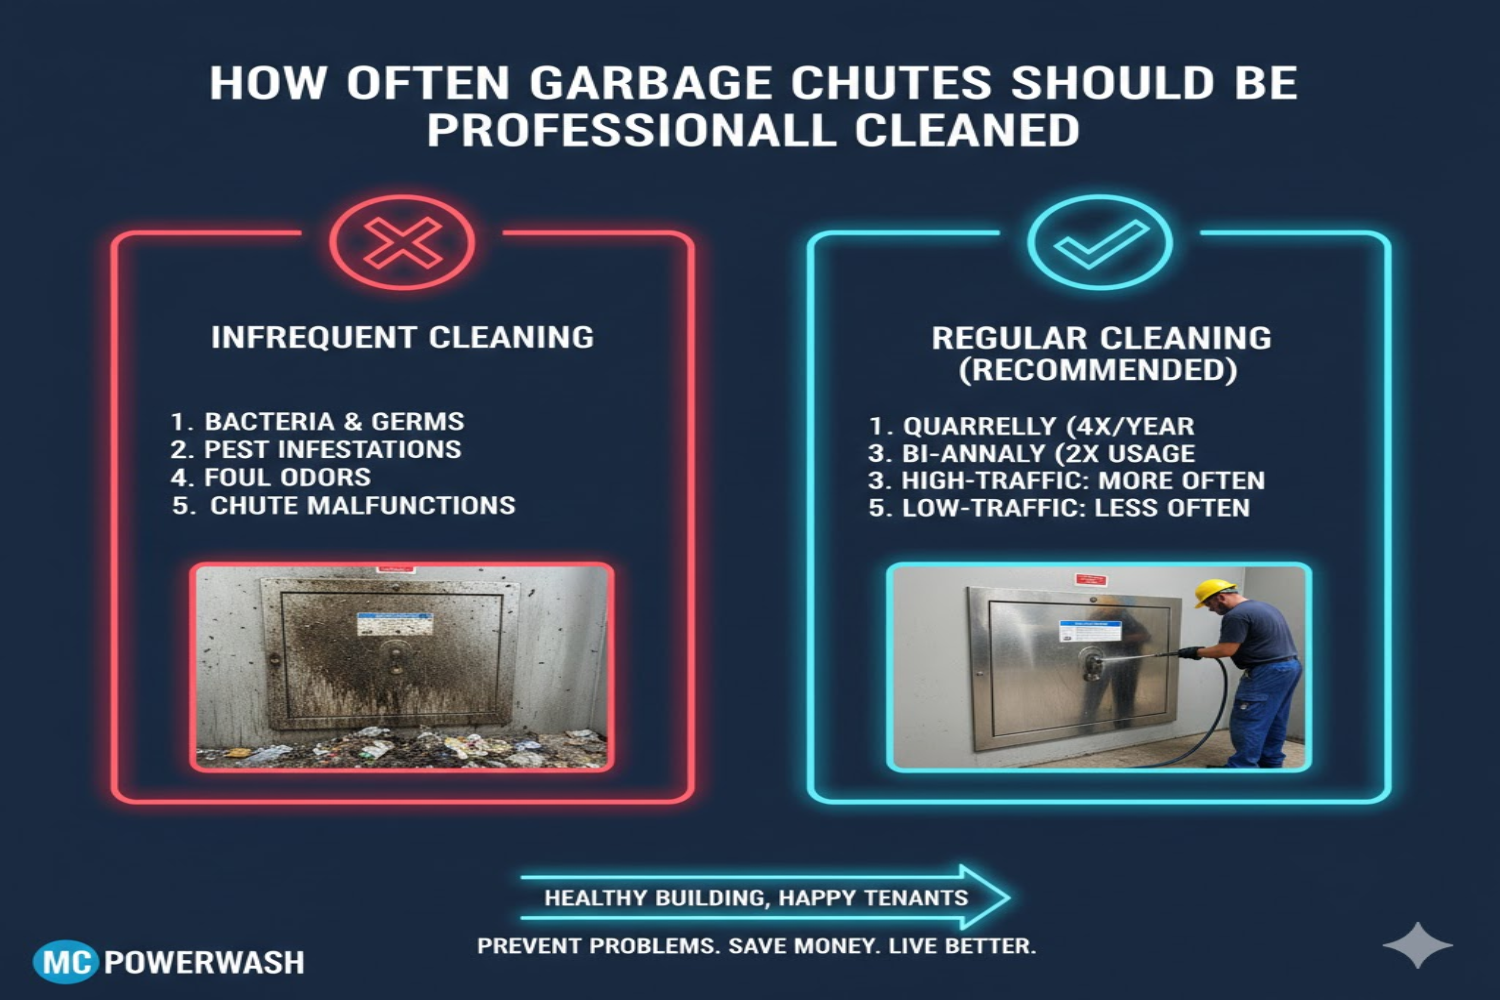
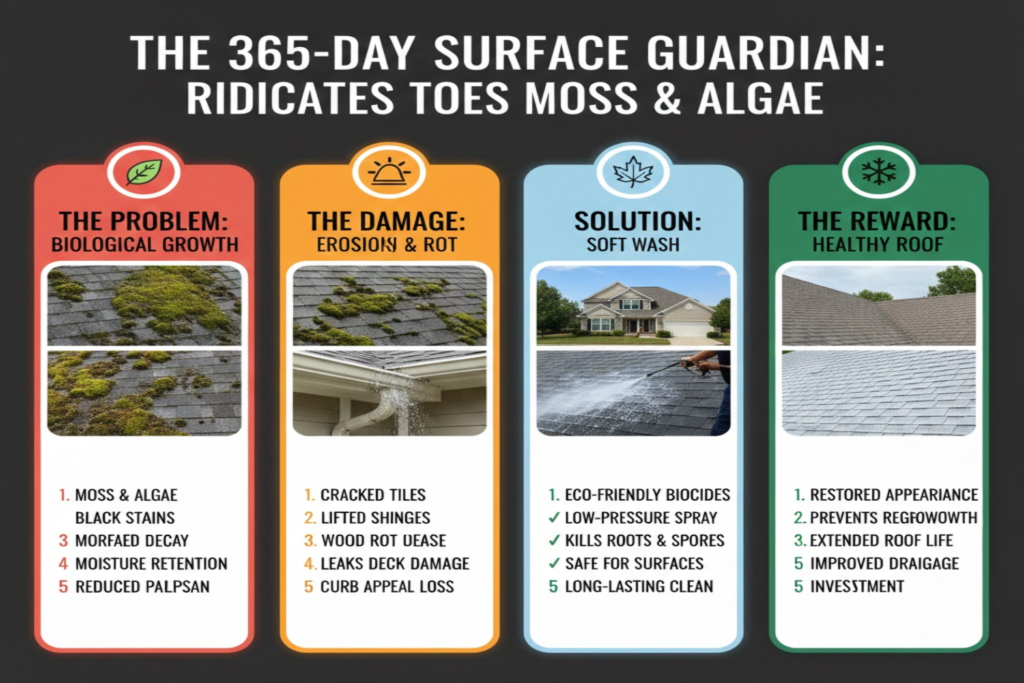
Outdoor walkways, especially those in the shaded or humid pockets of Southern California, often become the perfect “Petri dish” for organic growth. Unlike simple dirt or dust, moss and algae are living organisms that don’t just sit on the surface—they colonize it. These biological invaders thrive in the porous nooks and crannies of concrete, brick, and natural stone, utilizing moisture and lack of sunlight to build complex, resilient ecosystems.
Beyond the obvious aesthetic “dinginess,” the presence of algae and moss creates a significant safety liability. When wet, algae forms a microscopic “biofilm” that is as slick as ice, turning a standard garden path into a severe slip hazard for residents and delivery drivers alike. Furthermore, if left untreated, moss can physically degrade your hardscaping by expanding hairline cracks into major structural fissures. Pressure washing, when performed with the correct biological understanding, is the only way to move beyond a “temporary rinse” and achieve a deep, sterile clean that prevents the immediate return of these green and black stains.
2. The Anatomy of Moss and Algae on Concrete
To remove these organisms effectively, one must first understand how they “anchor” themselves to your property. Each type of organic growth presents a different challenge to the pressure washer.
Moss: The Structural Intruder
Moss is a non-vascular plant, meaning it doesn’t have traditional roots, but it uses “rhizoids” to anchor itself. These tiny, hair-like structures penetrate the pores of concrete and the sand joints of pavers. As moss grows, it acts like a sponge, holding water against the surface for weeks after a rainstorm. In colder climates or during winter nights, this trapped water can freeze and expand, physically “prying” the surface apart.
Algae: The Invisible Biofilm
The green or black “slick” you see on walkways is typically Gloeocapsa magma, a type of cyanobacteria (algae). This organism produces a dark, pigmented sheath that protects it from UV rays, which is why it often appears as black streaks or spots. Algae doesn’t have a root system, but it creates a sticky biofilm that acts like a “glue,” trapping dirt and carbon soot. This biofilm is what makes the surface so dangerously slippery.
Lichen: The Toughest Opponent
Lichen is a symbiotic relationship between fungi and algae. It appears as crusty, circular spots (often white, grey, or yellow) that seem to be “fused” to the stone. Lichen is notoriously difficult to remove because it secretes an acid that etches the stone, creating its own “grip.” Standard pressure washing often just “beheads” the lichen, leaving the anchor point behind to regrow almost immediately.
3. Preparation: Setting the Stage for Success
A professional “Green Clean” begins long before the machine is turned on. Proper preparation ensures that the biological removal is thorough and that the surrounding environment is protected.
The Dry Sweep and Mechanical Agitation
The first step is a heavy-duty dry sweep with a stiff-bristle broom. This removes the bulk of “loose” moss and debris. By manually agitating thick moss clumps before they get wet, you expose the “core” of the colony to the cleaning agents and prevent the pressure washer from simply pushing “moss mud” around the property.
Protecting the Periphery
The biocides used to kill algae (like Sodium Hypochlorite) are highly effective but can be “hot” for your lawn or delicate ornamental plants. Before starting, the “Pre-Wet” technique is essential. By saturating adjacent grass and plants with fresh water, you fill their “vascular system” so they cannot absorb the runoff from your cleaning agents. For high-value plants, covering them with a thin plastic drape is a secondary safety measure.
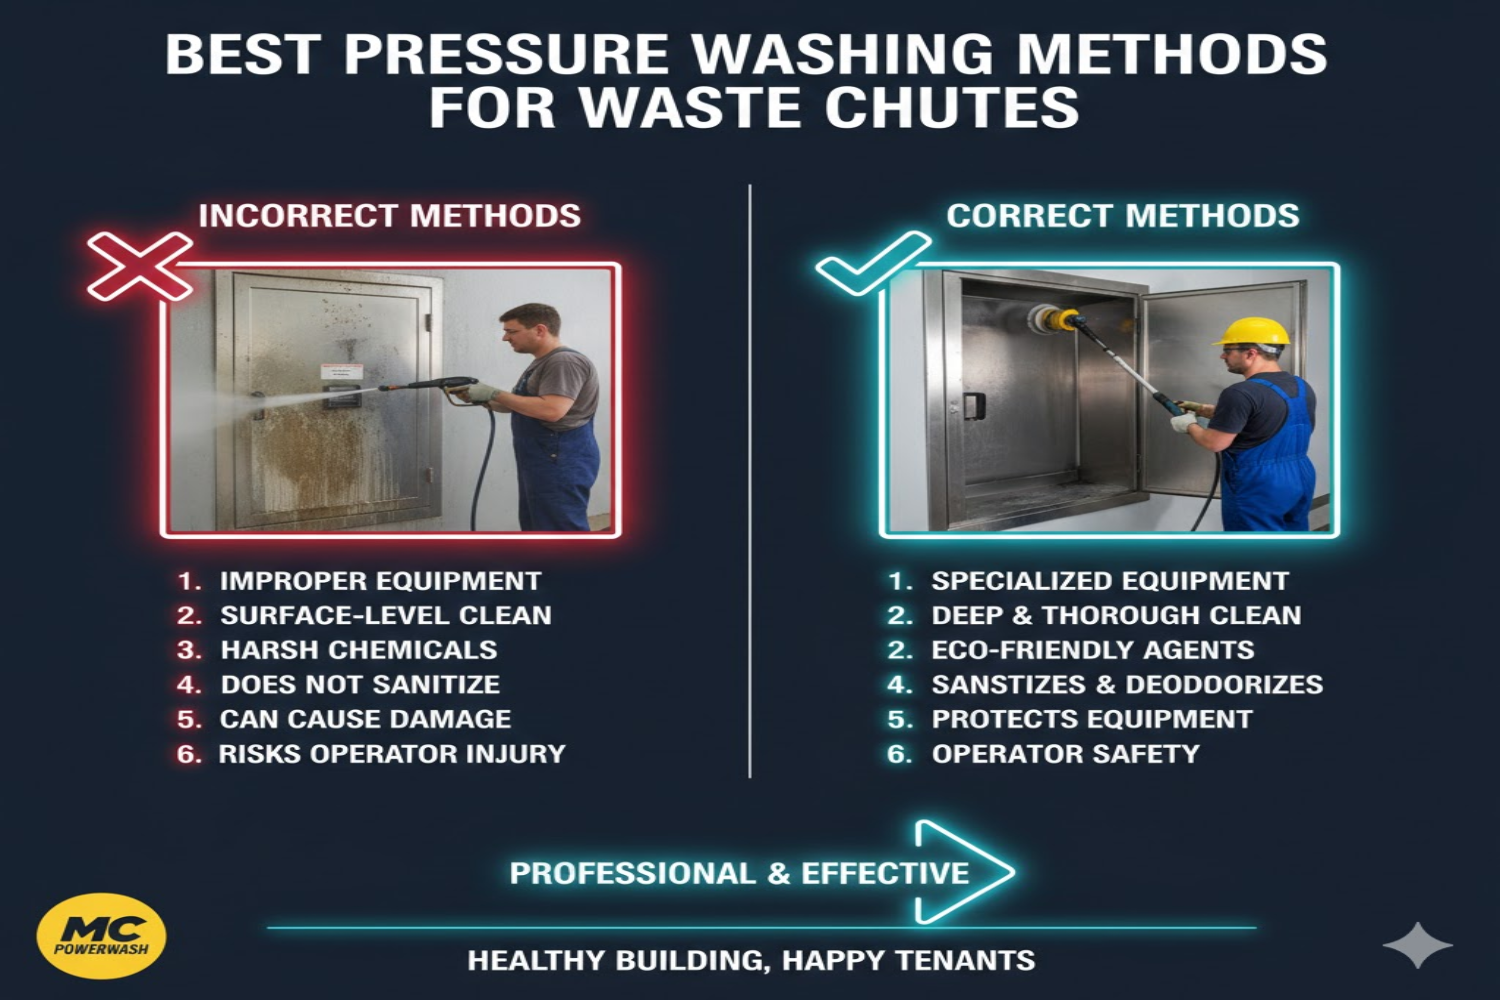
4. The Science of the “Soft Wash” vs. “High Pressure”
The most common mistake in moss removal is relying solely on “brute force” (high PSI). While high pressure may physically remove the green matter you see, it rarely kills the microscopic spores, leading to regrowth within weeks.
The “Blasting” Failure
If you use 4,000 PSI to “blast” moss out of concrete, you are often causing “pitting.” This makes the concrete more porous, creating even more “pockets” for new moss to take root in the future. Furthermore, a high-pressure jet can easily disperse millions of spores into the air, effectively “seeding” the rest of your property.
The Soft Wash Cocktail
The professional standard is a “Soft Wash” approach. This involves applying a chemical cocktail—typically a blend of Sodium Hypochlorite (1-3% strength) and a Surfactant. The surfactant lowers the water’s surface tension, allowing the bleach to penetrate the moss’s rhizoids and the algae’s biofilm. This process “oxidizes” the organic cells, killing them at the root level. Once the organism is dead (it will usually turn white or brown), it can be rinsed away with very low pressure, preserving the integrity of the stone.
5. The Organic Growth Treatment Matrix
| Growth Type | Appearance | Risk Level | Primary Treatment | Pressure Level |
| Green Algae | Slimy green film | High (Slip Hazard) | Sodium Hypochlorite | Low (Rinse only) |
| Black Algae | Dark streaks/spots | Moderate (Aesthetic) | Deep Dwell Surfactant | Moderate (1,500 PSI) |
| Thick Moss | Green “cushions” | High (Structural) | Mechanical + Biocide | Turbo Nozzle (Joints) |
| Lichen | Crusty white circles | High (Permanent) | Extended Acid/Bleach | Surface Cleaner |
6. Equipment Mastery: Choosing the Right Tools
When it comes to biological removal, the standard fan tip often feels like bringing a knife to a gunfight. To truly eradicate moss and algae from porous surfaces, you need specialized attachments that maximize hydraulic impact while maintaining surface safety.
The Turbo Nozzle (The “Dirt Killer”)
The Turbo Nozzle is the secret weapon for moss. It features a $0^\circ$ pencil jet that rotates at high speeds, creating a conical spray pattern. This provides the “tearing” force needed to rip moss out of paver joints and concrete cracks without the static, focused pressure that can etch the stone. It is particularly effective for cleaning the deep “pockets” where lichen and thick moss colonies reside. However, caution is required: never linger on a single spot, as the oscillating jet can still damage grout or delicate natural stone if held too close.
The Surface Cleaner Attachment
For large walkways, the Surface Cleaner is indispensable. This circular housing contains two or more spinning nozzles that maintain a consistent distance from the ground. It ensures a perfectly uniform, streak-free finish that is impossible to achieve with a manual wand. Because the pressure is distributed evenly, it is much safer for “soft” concrete or tarmac. Using a surface cleaner also prevents the “overspray” of algae spores, containing the mess within the deck and rinsing it away in a controlled flow.
PSI vs. GPM: The Flush Factor
Homeowners often chase high PSI (Pressure), but for organic removal, GPM (Gallons Per Minute) is more important. You need volume to “flush” the millions of loosened algae spores away. If you have high pressure but low volume, the spores simply settle back into the pores of the concrete a few feet away, leading to rapid regrowth. A professional-grade machine with $4.0$ to $8.0$ GPM ensures that the organic matter is completely evacuated from the property.
7. Step-by-Step Execution: The Restoration Workflow
A successful moss and algae removal follows a logical sequence. Skipping a step—like the pre-treat or the dwell time—is the primary reason for “reappearing” green stains.
Step 1: The Pre-Treat (The Chemical Kill)
Before the water starts flowing, apply your biocide (Soft Wash mix). Using a low-pressure pump sprayer, saturate the moss and algae. This is where the “Dwell Time” rule applies: the chemical needs 10 to 15 minutes to stay wet on the surface to fully oxidize the organic cells. You will actually see the green algae turn a sickly brown or white as it dies.
Step 2: The Deep Rinse and Extraction
Once the biocide has done its work, use your surface cleaner or turbo nozzle to rinse the area. Work in small, overlapping sections, moving from the highest point of the walkway toward the lowest. This prevents the “re-seeding” of spores into areas you have already cleaned. Pay special attention to the edges of the walkway, where soil and grass often hold extra moisture and spores.
Step 3: Joint Cleaning for Pavers
If cleaning a paver walkway, aim your nozzle at a 45-degree angle relative to the joints. This allows you to “scoop” out the moss without blasting the stabilizing sand out of the bottom of the gap. If you accidentally remove too much sand, be prepared to “re-sand” the joints once the walkway is completely dry to prevent new weeds from taking root.
8. Post-Wash Sterilization: Killing the Invisible Spores
Even a perfectly cleaned walkway can still harbor microscopic spores deep within the substrate. This is why many “clean” walkways turn green again in just a few months.
The “Post-Mist” Technique
After the final rinse, while the surface is still damp, apply a very light “post-treatment” of a residual inhibitor or a diluted Sodium Hypochlorite solution. Do not rinse this off. This final mist acts as a long-term disinfectant, sterilizing any remaining spores that were loosened but not removed. This step can extend the life of your clean walkway by 6 to 12 months compared to a water-only wash.
Why Sterilization Prevents the “Two-Week Regrowth”
In humid environments like Coastal California, airborne algae spores are constantly landing on your property. If the concrete is merely “clean,” it is a blank canvas for new growth. However, a post-treated surface is “bio-toxic” for a short period, preventing new spores from gaining a foothold while the stone fully dries out and hardens.
9. Common Mistakes That Damage Walkways
- The “Gouge” Mark: Holding a $15^\circ$ or $25^\circ$ nozzle too close to chase a stubborn moss root. This leaves a permanent “scar” in the concrete that will actually collect more dirt and algae in the future.
- Sand Displacement: Blasting directly down into paver joints. This removes the “polymeric sand” that locks pavers together, leading to shifting stones and tripping hazards.
- Chemical “Burn” on Grass: Forgetting to pre-wet or rinse the surrounding lawn. Concentrated runoff can leave “dead zones” along the edges of your beautiful walkway.
- Ignoring the “Lichen Shadow”: Not using enough dwell time on lichen. If you don’t kill the lichen “root” with chemistry first, you will leave behind a permanent white “shadow” on the stone.
10. Long-Term Prevention Strategies
The best way to manage moss and algae is to make your walkway a “hostile environment” for their growth.
Sunlight, Airflow, and Drainage
Organic growth loves three things: shade, stagnant air, and standing water.
- Pruning: Trim back overhanging branches to let more UV light hit the path. Sunlight is a natural biocide.
- Drainage: If water pools on your walkway after rain, the algae will never truly leave. Consider re-leveling sunken pavers or installing a small “French drain” to move water away.
Hydrophobic Sealers
Once the walkway is clean and bone-dry, apply a Silane-Siloxane sealer. This doesn’t just sit on top; it penetrates the pores and makes the stone “hydrophobic” (water-fearing). When it rains, the water will bead up and roll off rather than soaking into the concrete. Without a wet substrate, moss and algae simply cannot grow.
11. Conclusion: Reclaiming the Path
A moss-covered walkway is more than a maintenance chore; it is a safety risk and a drain on your property’s value. Reclaiming that path requires more than just a blast of water—it requires a tactical approach that combines the right machinery with the right chemistry. By following the “Green Clean” workflow, from pre-treatment to post-wash sterilization, you transform your walkways from a slippery, dingy liability into a bright, welcoming asset that reflects the true quality of your home.
12. FAQs: Expert Answers for Homeowners
Is pressure washing enough to kill moss permanently?
No. Pressure washing is a physical removal. To kill it “permanently” (or for a long duration), you must use a chemical biocide and follow up with a sealer to eliminate the moisture it needs to survive.
Can I use vinegar or baking soda?
Vinegar is an acid and can “etch” or damage concrete and natural stone. Baking soda is safer but rarely strong enough for heavy infestations. Professional-grade Sodium Hypochlorite is the industry standard for a reason: it works fast and neutralizes quickly.
Will pressure washing damage my garden?
Not if you follow the “Pre-Wet, Post-Rinse” protocol. By keeping the plants saturated with fresh water, the cleaning agents will be diluted below the point of toxicity before they reach the plant’s roots.