For many homeowners, a brick paver patio or driveway is the pinnacle of outdoor elegance. Whether it’s a historic red-brick path in Pasadena or a modern interlocking paver courtyard in Beverly Hills, these surfaces offer a timeless aesthetic that standard poured concrete simply cannot match. However, to maintain them, one must understand that a paver system is a “living,” flexible structure—not a solid, immobile slab.
Unlike concrete, which relies on a monolithic pour, a paver system consists of thousands of individual units held in place by friction, a compacted base, and most importantly, joint sand. This sand is the “interlocking” hero; it prevents the bricks from shifting, allows for water drainage, and absorbs the structural load of vehicles or foot traffic. If you approach a paver system with the same aggressive, high-pressure mindset used for a warehouse floor, you risk catastrophic failure. Standard pressure washing techniques—blasting directly down at high PSI—will fail because they ignore the physics of the joint. This guide will teach you the finesse required to clean your pavers without hollowing out the foundation of your beautiful Los Angeles estate.
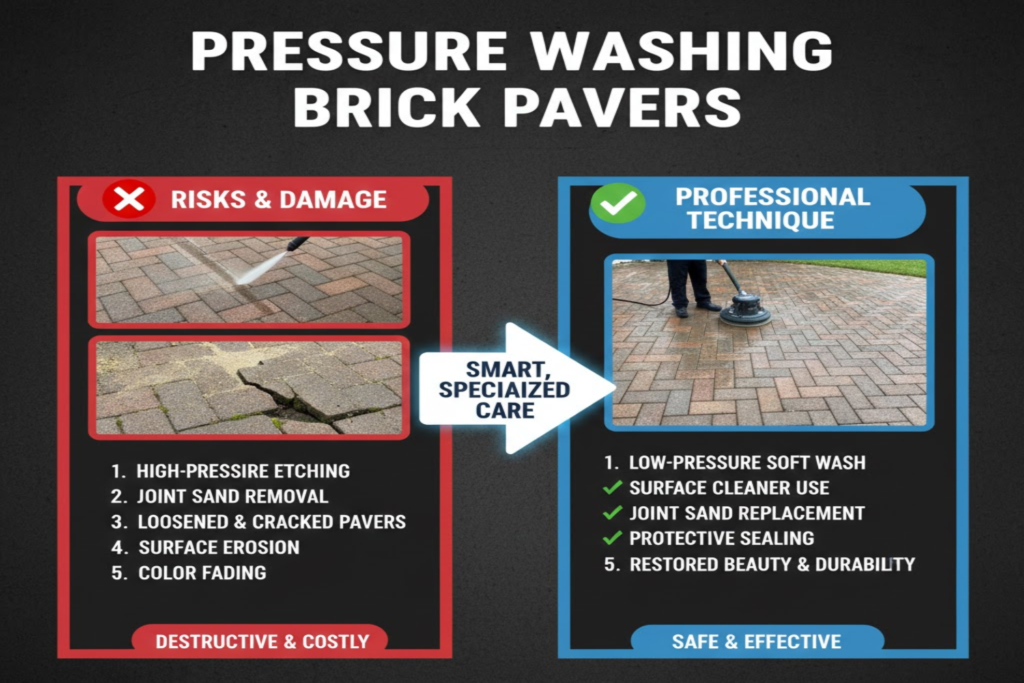
2. Understanding the Risks: What Could Go Wrong?
Before you pull the trigger on your pressure washer, you must recognize that brick pavers are significantly more vulnerable to mechanical force than other masonry.
- Joint Sand Displacement: The most immediate danger is “hollowing out.” When high-pressure water hits the gap between pavers, it acts as a vacuum, sucking out the sand that provides the lateral stability. Without this sand, the pavers lose their interlock, leading to an uneven surface that is prone to “rocking.”
- Surface Pitting and Scarring: Brick pavers, especially clay-based ones, often have a delicate “antique” finish or a protective kiln-fired glaze. Excessive PSI can pit the surface, creating a “sandpaper” texture that attracts dirt faster and looks permanently dull.
- Structural Shifting (Sub-Base Erosion): If you dwell too long in one spot with high pressure, water can penetrate through the joint and reach the underlying sand or gravel base. Once the sub-base is saturated and eroded, the pavers will begin to sink or “dip,” creating dangerous trip hazards and puddles that are incredibly expensive to remediate.
3. Essential Gear for Paver Success
To clean pavers like a Los Angeles pro, you need a specialized toolkit that emphasizes control over raw power.
- The Variable Pressure Wand: You cannot use a “one-speed” machine. You need a pressure washer that allows you to dial down the pressure to between 1200 and 1800 PSI. This is the “sweet spot” where you can lift grime without excavating the joints.
- The Wide-Fan Nozzle (40-Degree White Nozzle): The white nozzle is your best friend. Its wide, gentle fan distributes the impact over a larger area, reducing the “strike force” on the brick’s surface while still providing enough flow to move dirt.
- Polymeric Sand: This is the “secret sauce” for restoration. Unlike regular play sand, polymeric sand contains additives that “lock” or turn into a flexible glue when misted with water. It prevents weed growth and stays put during future rains.
- The Push Broom & Leaf Blower: Professional paver cleaning starts dry. A stiff push broom is essential for removing heavy debris, while a leaf blower ensures the surface is clear of organic matter that could turn into “mud-paste” once the water hits.
4. Pre-Wash Chemistry: Loosening Grime Gently
Because we are using lower pressure to protect the joints, we must rely on chemistry to do the heavy lifting. In the intense Los Angeles sun, the “dwell time” (how long the chemical sits) is your most powerful cleaning agent.
Sodium Percarbonate (Oxygen Bleach)
This is the safest choice for brick. It effectively breaks down organic stains—like leaf tannins or bird droppings—without the harsh bleaching effect of chlorine that can turn red bricks into a faded pink.
Targeted Algaecides
If you have green moss or black mold growing in the shaded joints of your patio, a targeted algaecide is necessary. This kills the spores at the root.
The Dwell Time Secret
Apply your cleaner and let it sit for 10 to 15 minutes. Do not let it dry! In the dry LA air, keep a light mist from your garden hose going over the area. This “dwell time” allows the chemicals to emulsify the oils and kill the mold, meaning you only need a gentle rinse to achieve a “like-new” look.
5. Paver Cleaning Specs
Use this guide to match your pressure settings to your specific paver material.
| Paver Material | Recommended PSI | Best Nozzle | Cleaning Agent | Joint Strategy |
| Antique Clay Brick | 1000 – 1200 | 40° (White) | Sodium Percarbonate | Low-angle rinse only |
| Concrete Pavers | 1500 – 1800 | 25° or 40° | Alkaline Degreaser | Surface Cleaner (Low PSI) |
| Tumbled Stone | 1200 – 1500 | 40° (White) | pH-Neutral Soap | Hand-scrub edges |
| Interlocking Pavers | 1500 – 2000 | 40° (White) | Algaecide / Soap | Re-sand immediately |
6. Step-by-Step Execution: The “Low-Angle” Technique
Success in paver cleaning is all about the angle of attack. Follow this professional workflow to ensure a perfect finish.
Step 1: The Dry Sweep
Before introducing water, sweep the patio thoroughly. Removing loose soil, leaves, and twigs prevents you from creating a “mud-slurry” that can get pushed deeper into the joints during the washing phase. Use a leaf blower to clear out any hidden debris in the corners.
Step 2: The Soft-Wash Pre-Treat
Apply your chemical solution using a low-pressure pump sprayer. Ensure even coverage. This is where the restoration happens—let the chemistry “eat” the grime. Remember: the better your pre-treatment, the less pressure you’ll need later.
Step 3: The 45-Degree Rule (Crucial!)
When you begin pressure washing, never spray directly down (90 degrees) into the joints. Instead, hold your wand at a 45-degree angle. This allows the water to skim across the top of the brick and lift the dirt out without digging into the sand. Think of it like a broom—you want to “sweep” the dirt off the surface, not “drill” into the joints.
Step 4: The Perimeter Flush
Once the main area is agitated and clean, perform a final high-volume rinse. Work from the house out toward the drainage point. This “flush” removes any loosened silt that could settle back into the texture of the brick. Keep your wand moving in a rhythmic, side-to-side “Z-pattern” to ensure no streaks are left behind.
To finalize our authoritative guide on brick paver restoration, we move into the “finesse” phase. Cleaning the surface is only half the battle; the true hallmark of a Los Angeles professional is how they restore the structural integrity and aesthetic depth of the pavers after the water has dried.
7. Professional Tips & Tricks: The Insider’s Edge
Even with the best equipment, small “hacks” can make the difference between a botched DIY attempt and a magazine-quality restoration.
- The “Penny Test”: Before and after washing, perform a sand-depth check. Slide a penny into the joint. If the penny disappears more than halfway ($1/2$ inch), your joints are dangerously low. This indicates that the structural “interlock” is compromised and you must prioritize re-sanding to prevent the pavers from shifting under weight.
- Cardboard Shielding: In the manicured gardens of Beverly Hills or San Marino, a single splash of high-alkaline cleaner can ruin a rare rosebush. Keep large sheets of cardboard or plastic plywood on hand. Use them as moveable shields to protect delicate plants, wooden siding, or painted door frames from chemical overspray and high-pressure backsplash.
- The “Z-Pattern” Sweep: To avoid the dreaded “tiger stripes” (uneven cleaning lines), use the Z-pattern. Instead of long, straight strokes, move the wand in a tight, overlapping zig-zag. This ensures that every square inch of the brick receives the same “dwell time” under the water stream, resulting in a perfectly uniform color.
8. Post-Wash Restoration: Re-Sanding is Non-Negotiable
If there is one rule to remember, it is this: You cannot wash pavers without losing sand. Even with the best 45-degree technique, some sand will inevitably be displaced. If you do not replace it, your patio will eventually fail.
Why Re-Sanding is Critical
Joint sand acts as a “shock absorber.” Without it, pavers rub against each other, leading to chipped edges. More importantly, empty joints are an open invitation for weed seeds and ants to colonize your patio.
Polymeric Sand vs. Regular Sand
In Los Angeles, Polymeric Sand is the gold standard. While regular masonry sand is cheaper, polymeric sand contains specialized polymers that harden when misted with water. This creates a semi-rigid joint that resists wash-outs during heavy California rainstorms and acts as a powerful weed deterrent.
Setting the Sand
Once you have swept the new sand into the joints (ensuring the pavers are 100% dry), you must “set” it. For large driveways, renting a Vibratory Plate Compactor is best; it shakes the sand deep into the crevices. For smaller patios, Hand-Tamping or simply tapping the bricks with a rubber mallet will help the sand settle before the final misting.
9. Dealing with Efflorescence and White Haze
A common frustration for homeowners is the appearance of a “white powder” on the bricks a few days after cleaning. This is efflorescence.
Why It Happens
Efflorescence occurs when water brings natural mineral salts from within the brick or the sub-base to the surface. As the water evaporates in the LA sun, it leaves the salt behind as a white haze.
The Fix
Do not try to blast this off with high pressure! You need a specialized Efflorescence Remover (a mild acid). This chemically dissolves the salt crystals, restoring the deep, rich reds and burnt oranges of your clay bricks. Apply the solution, scrub lightly, and rinse with low pressure.
10. Sealing the Deal: Protecting Your Hard Work
Sealing is the final “insurance policy” for your driveway or patio. In the intense UV environment of Southern California, an unsealed brick will fade and become brittle over time.
- Sealer Types: * Film-Forming (Wet Look): These provide a glossy finish that darkens the brick and makes the colors “pop.” They are excellent for repelling oil and grease.
- Natural Finish (Penetrating): These go deep into the pores without changing the look of the brick. They are ideal if you prefer a matte, historic aesthetic.
- The Weed Barrier: A quality sealer “locks” the polymeric sand in place, making it virtually impossible for weeds to take root.
- The 48-Hour Rule: Never seal a damp patio. In Los Angeles, you must wait at least 24 to 48 hours after washing to ensure no moisture is trapped under the sealer, which can cause a permanent “cloudy” or milky white appearance.
11. Conclusion: Preserving the Timeless Look of Brick
There is a profound sense of satisfaction in watching a weathered, weed-choked paver patio transform back into a pristine architectural feature. Brick pavers are a premium material, and they require a premium approach to maintenance.
By prioritizing finesse over force, using the right chemistry, and never skipping the re-sanding process, you protect the structural foundation of your home’s exterior. In the high-end landscape of Los Angeles, a well-maintained brick entrance is more than just a path—it is a testament to the care and value you place on your property. Take your time, follow the 45-degree rule, and enjoy the timeless beauty of a professionally restored brick surface.
12. FAQs: Paver Cleaning & Maintenance
Q: Can I use a surface cleaner on pavers?
A: Yes, but with caution. A surface cleaner is great for speed and uniformity, but you must “hover” it slightly or turn the pressure down to avoid deep-cleaning the joints too aggressively. If your pavers are uneven, a surface cleaner can “catch” an edge and chip the brick.
Q: How do I stop weeds from coming back after I wash the joints?
A: The “Secret Trinity” is: Kill, Clean, and Seal. Kill the weeds with a systemic herbicide, clean the joints thoroughly, refill with Polymeric Sand, and apply a Joint-Stabilizing Sealer. This 4-step process is the only way to stop weeds for the long term.
Q: Will pressure washing change the color of my bricks?
A: It won’t change the actual pigment, but it will remove the “patina” of dirt and oxidation. Your bricks will likely look much brighter and “redder” than they have in years. If you want to keep the “aged” look, use very low pressure and avoid heavy degreasers.